We present: our family’s dumpling recipe. This was the first dumpling recipe we ever published (originally posted on October 13, 2013, just 4 months after we started The Woks of Life).
And while we’ve shared many other Chinese dumpling recipes since, this was the OG—the blueprint and the foundation of the recipes that came after, which is why we confidently gave it the moniker, “The Only Dumpling Recipe You’ll Ever Need.”
A Family of Dumpling Makers
I’m of the opinion that the Shanghainese are the Botticelli’s—the Michelangelo’s, Velasquez’s, and Van Gogh’s—of dumpling making. No one does it quite like they do. Luckily, I have a very loud, dumpling-making Shanghainese side of the family.
We’ve been making this dumpling recipe for a long time. A LONG time. I remember sitting on a stool in my grandmother’s kitchen on 161st Street in Queens, learning to fold these…my seven-year-old fingers clumsily stumbling over everything…getting the wrappers way too wet, putting in too much filling, and crossing my fingers by the stove in a futile attempt to keep them from opening up while they cooked.
It was a time when my only cares in the world were how I was going turn my weekly $5 allowance into a new puppy, staying in Mrs. Alercio’s (Gregory Elementary school’s most feared second grade teacher) good books, and making sure I kept up with the latest episodes of Boy Meets World.
Nowadays, my grandmother, my mom, my sister, and I get all Joy Luck Clubby about it and sit down at the kitchen table every so often to make an enormous batch for the freezer.


We’ve been making some variation of this same recipe for as long as I can remember, and I’ve been eating them and sharing them for just as long—a quick meal on a lazy weeknight, an appetizer at one of my parents’ dinner parties, a well-deserved after school snack, or a taste of home at college. One of Kaitlin’s high school friends can literally devour them by the plateful.
We’ve eaten a lot of dumplings in Beijing, Shanghai, and elsewhere, but somehow, we always come back to these.
Can’t find store-bought dumpling wrappers?
Make your own with just flour and water, using our homemade dumpling wrapper recipe! This recipe makes enough filling for 7-8 dozen dumplings, while our wrapper recipe makes enough for 8-9 dozen. You may have extra wrappers leftover, but that’s ok. We have ideas in the post for what to do with leftover wrappers! (Hint: you can make shortcut scallion pancakes with them!)
Gluten-free? Check out our gluten-free dumpling wrapper recipe, to use with any of our dumpling fillings.
Chinese Dumplings: Recipe Instructions
Choosing a Vegetable for the filling:
Okay, let’s talk veg. In particular, leafy green vegetables.
When we first blogged this recipe in 2013, we used Shepherd’s Purse, or jìcài (荠菜). Below, you’ll see that they look kind of like a cross between dandelion greens and arugula, which we were able to purchase fresh when we lived in Beijing.
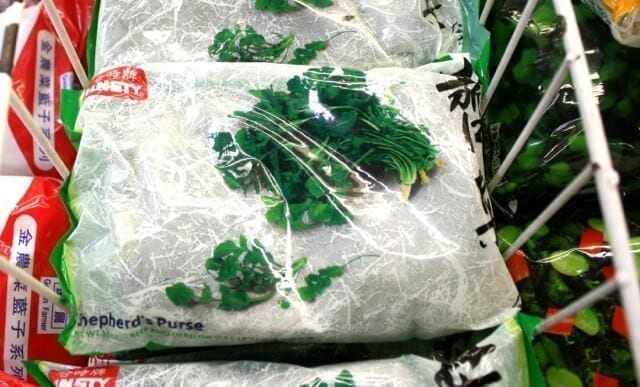
In the US, you’ll only find shepherd’s purse in the frozen foods section of a well-stocked Chinese grocery store. If you can get it, then grab those babies out of the freezer section and never let go. It’s so much more convenient to use than the fresh stuff.
Last year, we bought some Shepherd’s purse seeds and managed to grow some in the garden. They looked a little bit like weeds, but boy do they have great flavor for dumplings and wontons. If you’re a gardener, and like dumplings or wontons, then get yourself some seeds and start cultivating!
But…if you find yourself in a place where one could never hope to locate an obscure Chinese vegetable, we also encourage the use of vegetables that you don’t need to tear your hair out to find.
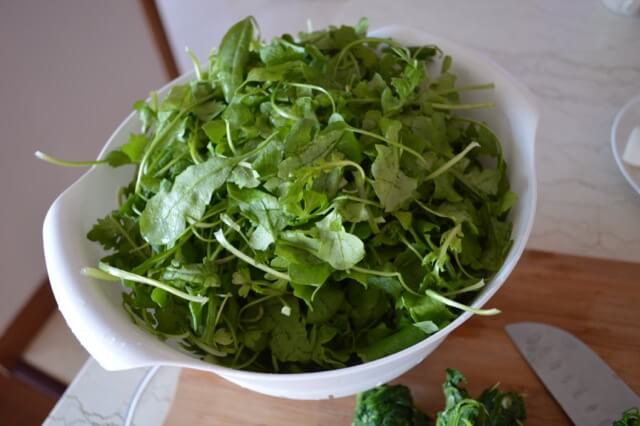
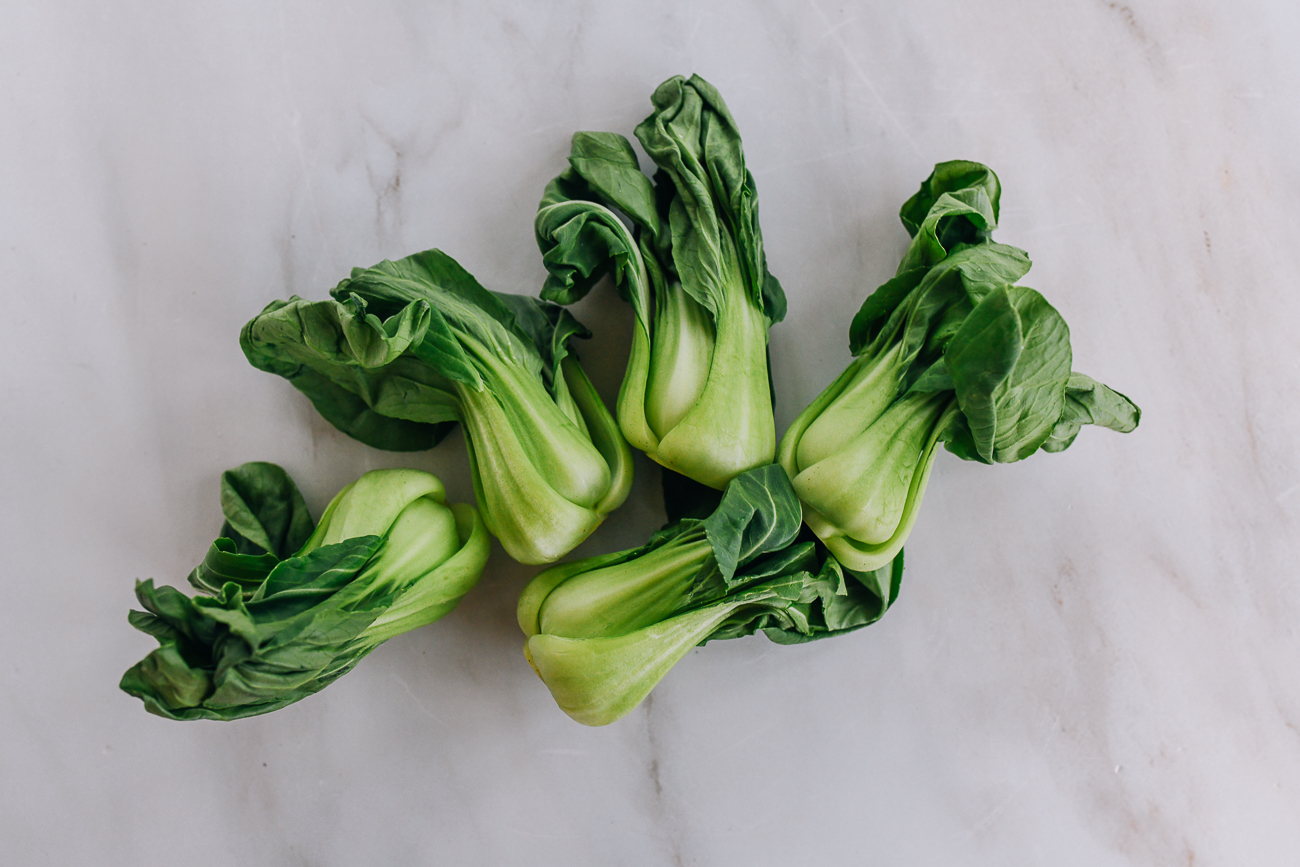
You can go with baby bok choy (the tender little green ones. Not the giant, stringy ones you find at Stop & Shop), napa cabbage, or Chinese chives. If using fresh, all of these vegetables need to go through a blanching process, with the exception of the Chinese chives (which can just be chopped finely and then thrown in with the meat).
Preparing the Vegetables:
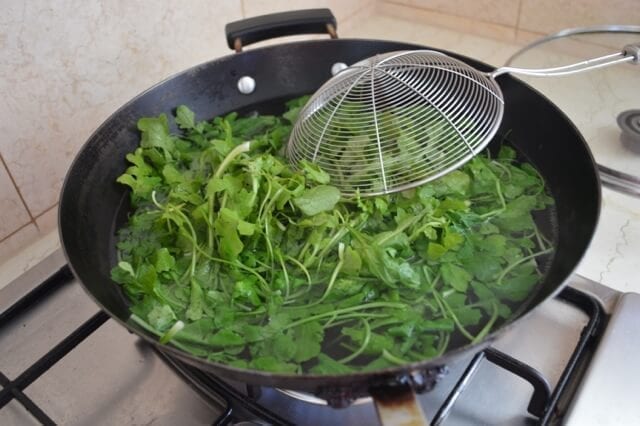
So first things first. Wash your veg to get them really clean. No one likes a sandy dumpling. Blanch them for 1-2 minutes (less time for a more delicate vegetable like Shepherd’s Purse and slightly more time for a more robust vegetable like baby bok choy). Throw them in an ice bath or just rinse under cold water.
See us blanching shepherd’s purse below, left, and blanching baby bok choy below on the right:

If using frozen ji cai, just defrost the veg, rinse it well under cold water, and praise the Gods for making it easy on you. (Washing fresh ji cai is a slow, tedious, finger-numbing task that I’m sure they would have in Tartarus if the Greeks had ji cai).
Drain the vegetables…

And squeeze the water out of the vegetables. Ring out the veggies like you’re squeezing a washcloth. Get all the liquid you can out of them.


Get out the chopping block and chop the veggies VERY finely. As finely as you possibly can, or the filling will be overly stringy. Not the adjective we’re looking for in this instance.
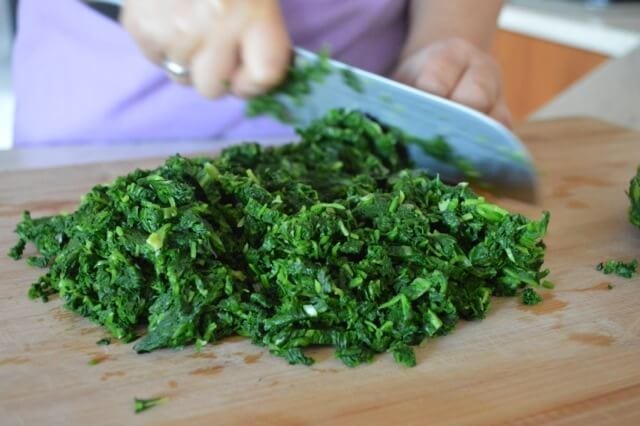

If you’d rather not hand-chop the vegetables, you can also do so in a food processor. Pulse in small batches until the vegetables are finely chopped. Do not run the food processor for too long or puree the vegetables! Stop the food processor periodically and scrape down the sides to ensure even chopping.
Here’s what it should look like:

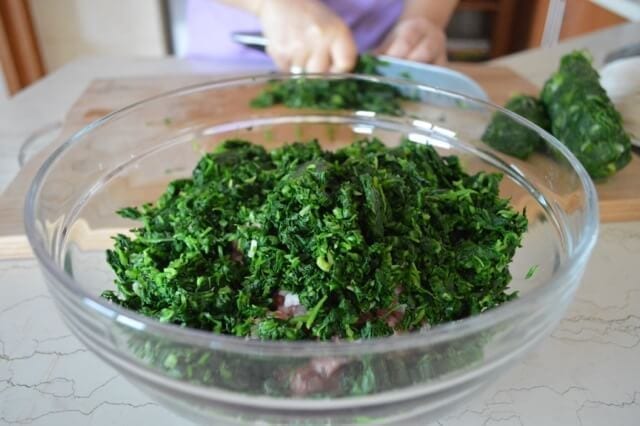
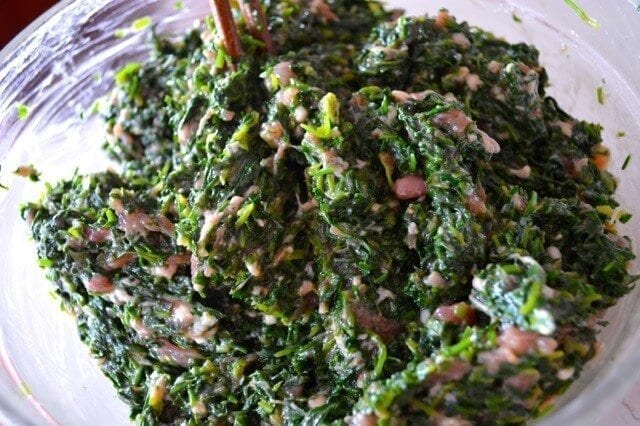
Making the filling:
Add the vegetables to a large mixing bowl along with the meat. You can change the ratio of meat to vegetable in this dumpling recipe to however you like. We like a lot of veg with less meat, but you can replace some of the veg with more meat if you like. Your meat should also be relatively fatty. Too lean, and the poor things will be dry and lifeless.
Vegetarian dumplings?
We suggest NOT going all vegetarian with these dumplings. Vegetarian dumplings are tricky little things. One needs a whole new plan of attack (we have a separate vegetable dumpling recipe).
Add the Shaoxing wine, oil, sesame oil, salt, soy sauce, white pepper, and water.
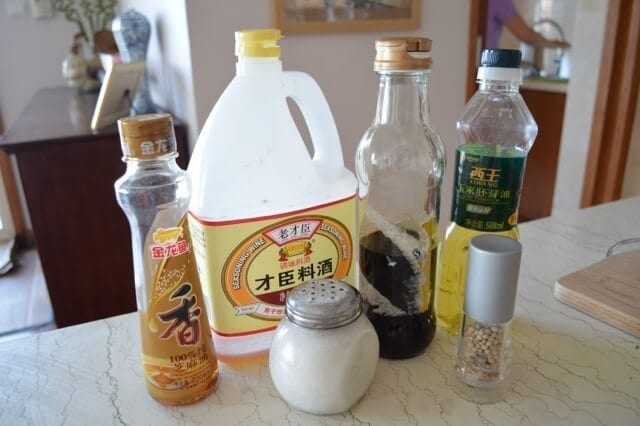
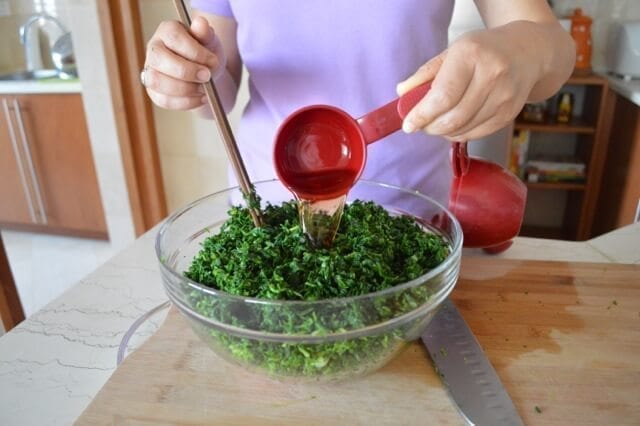
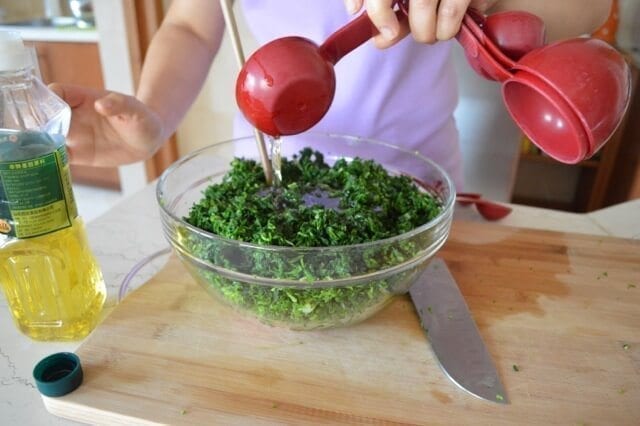
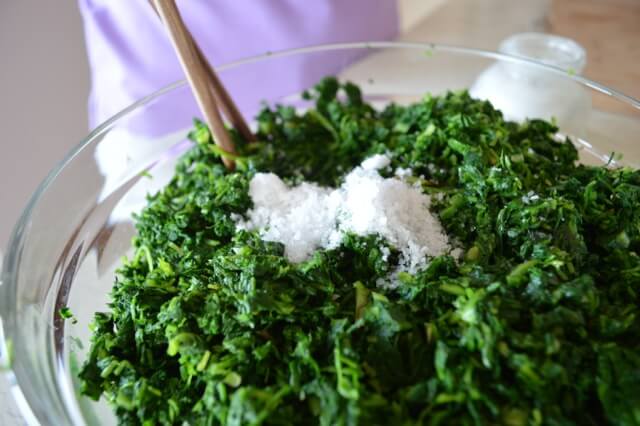
And…mix.
And mix.
And then mix some more.
What you’re doing here is creating a very soft, smooth texture for the filling. It’s really important to mix your filling until it almost looks like a paste. We find that grabbing two pairs of chopsticks in one’s fist, followed by 6-8 minutes of exuberant stirring yields the best filling consistency. It may take up to 10 minutes to get your filling to the proper consistency.

Assembling the dumplings:
And now…the wrapping. Don’t be afraid! It’s not as hard as it looks. You, dear reader, are probably not a seven-year-old with clumsy hands, and you’ll probably figure it out faster than I did in my cartoon-watching days. (Okay, let’s be real. I still watch cartoons. I’m a major dork for anything having to do with air-bending, 90s-era Nickelodeon, and Pixar. I have the emotional maturity of a twelve-year-old, apparently).
Ahem.
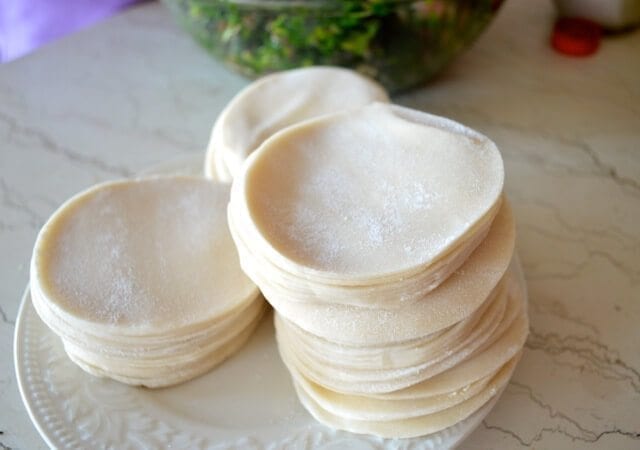
Anyway, you can buy dumpling skins at the Asian grocery store. You’re looking for the white round ones. If left out in the open air for too long, you may find that the edges start to dry out.
If that happens, wrap them in a damp paper towel and put them in a sealed plastic bag for a couple hours to soften back up. You can freeze any unused dumpling wrappers in an airtight sealed plastic bag for later.

To the wrapping! Get yourself a little bowl of water and dampen the edges of each wrapper. Then place a little less than a tablespoon of filling in the middle.
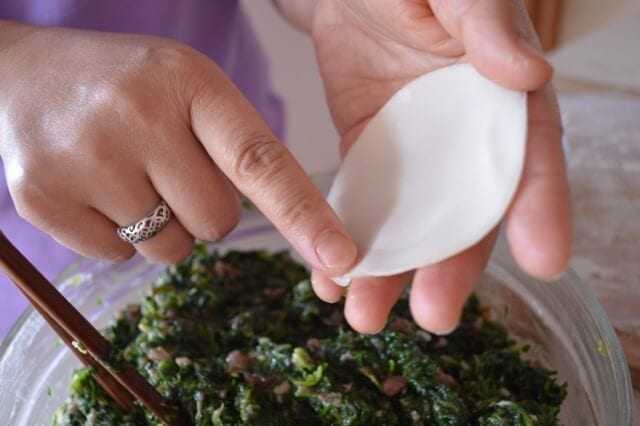
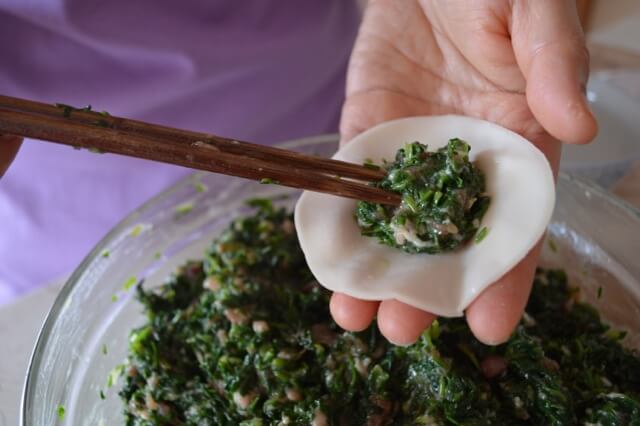
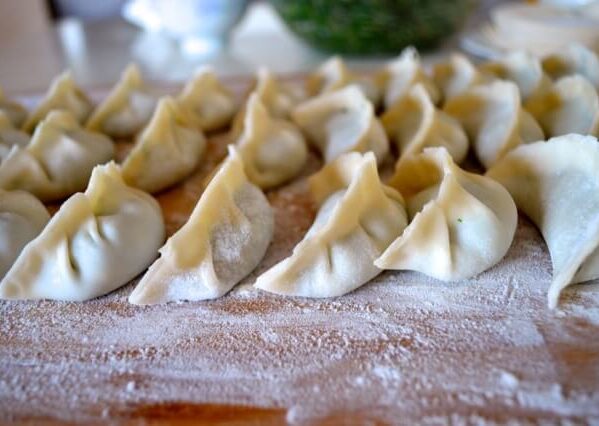
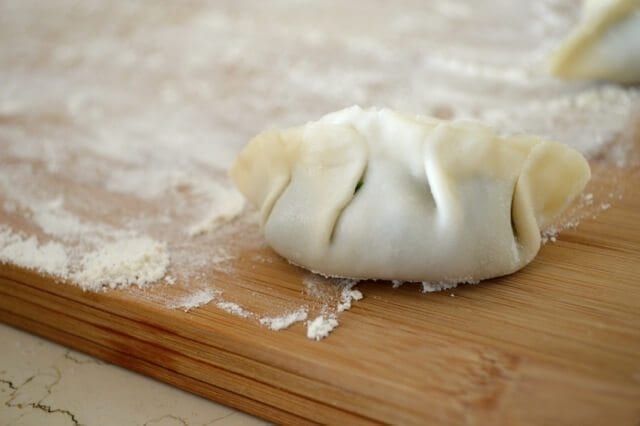
There are several ways to do this next wrapping step, but the easiest way for first timers is to pinch the wrapper in half at a point in the middle, and then fold the skins over twice on each side.
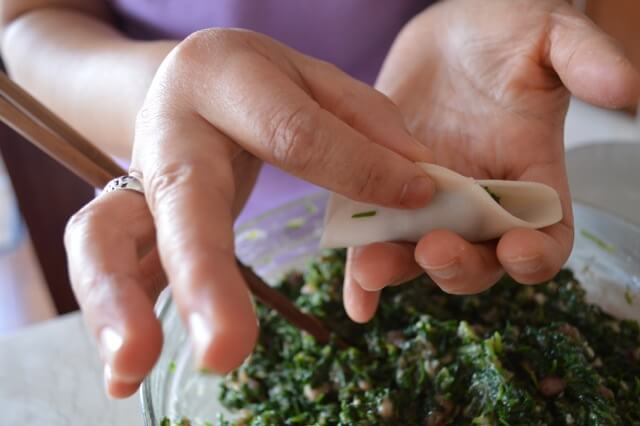
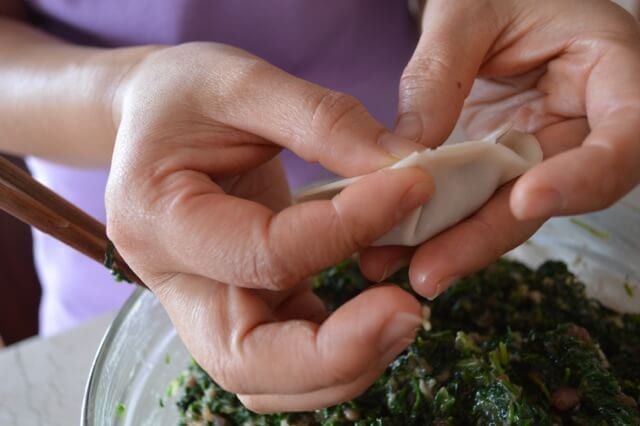
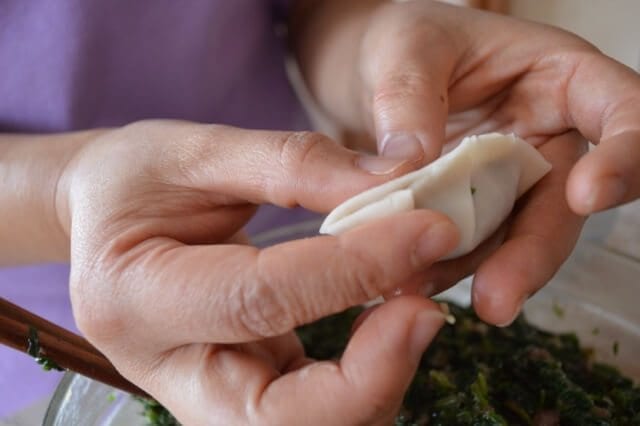
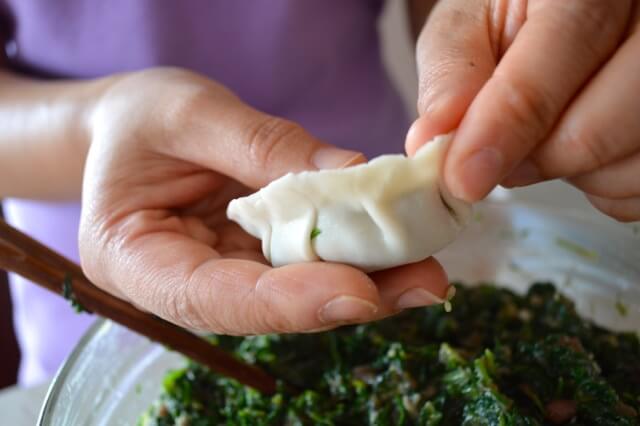
At the end, it will look kind of like a little fan.
An adorable, tasty fan.
And that’s it! (For more pictures and detailed instructions, check out our full tutorial on how to fold dumplings, using 4 techniques from beginner to advanced.)
Tip! Taste Test!
Boil a test dumpling and taste it for salt and flavor. Perhaps you added a little more meat than our dumpling recipe called for. Perhaps your salt isn’t as salty, or your soy sauce is a different brand than we use.
It’s not an exact science, but the only way to figure out how to get the flavor right is to test and taste. Add a little of this or that…sesame oil, soy sauce, salt, pepper, wine, water…if you think it needs it. Once you’ve got the perfect filling, go through the dumpling folding steps.
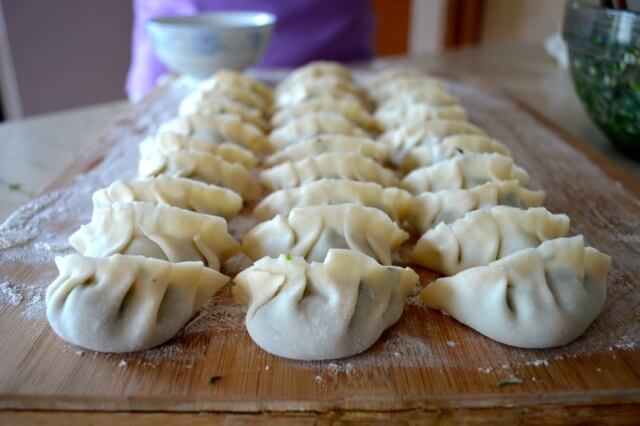
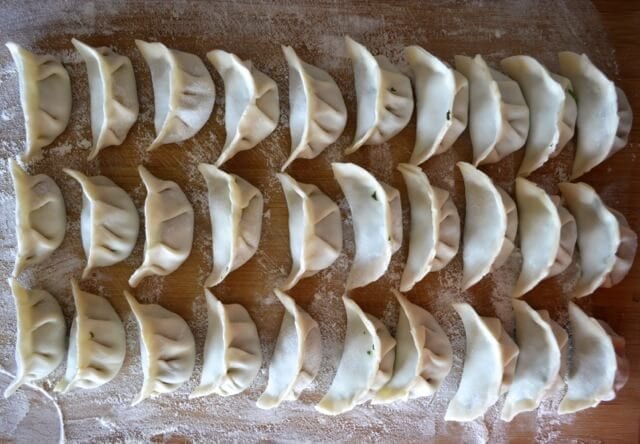
Keep doing that…for the next 2 hours, or until all your filling is gone. Put on the TV, grab a dumpling buddy, and get to work. If you plan to eat them fresh, just place them on a floured surface to keep them from sticking. If you plan to freeze them for later, place them on a baking sheet lined with parchment paper, making sure that none of the dumplings are touching.
It’s an art in and of itself to try to adjust the filling amounts you put in as filling and wrapper supplies deplete–to try and use all of both. If we have more wrappers, I reduce the amount of filling I put in a bit. If we don’t have enough, then I make bigger dumplings. But if you end up with leftovers, don’t sweat it. You can wrap up extra dumpling wrappers for later, and make the filling into little meatballs and fry them up.

Time to taste the fruit of our labors!
Cooking Dumplings:
Here’s how you cook them. You have a few choices.
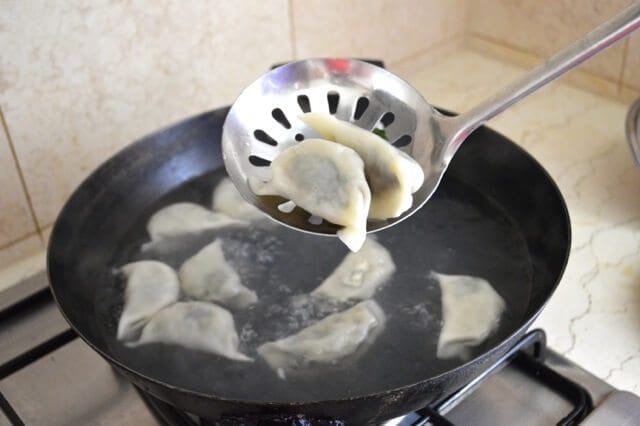
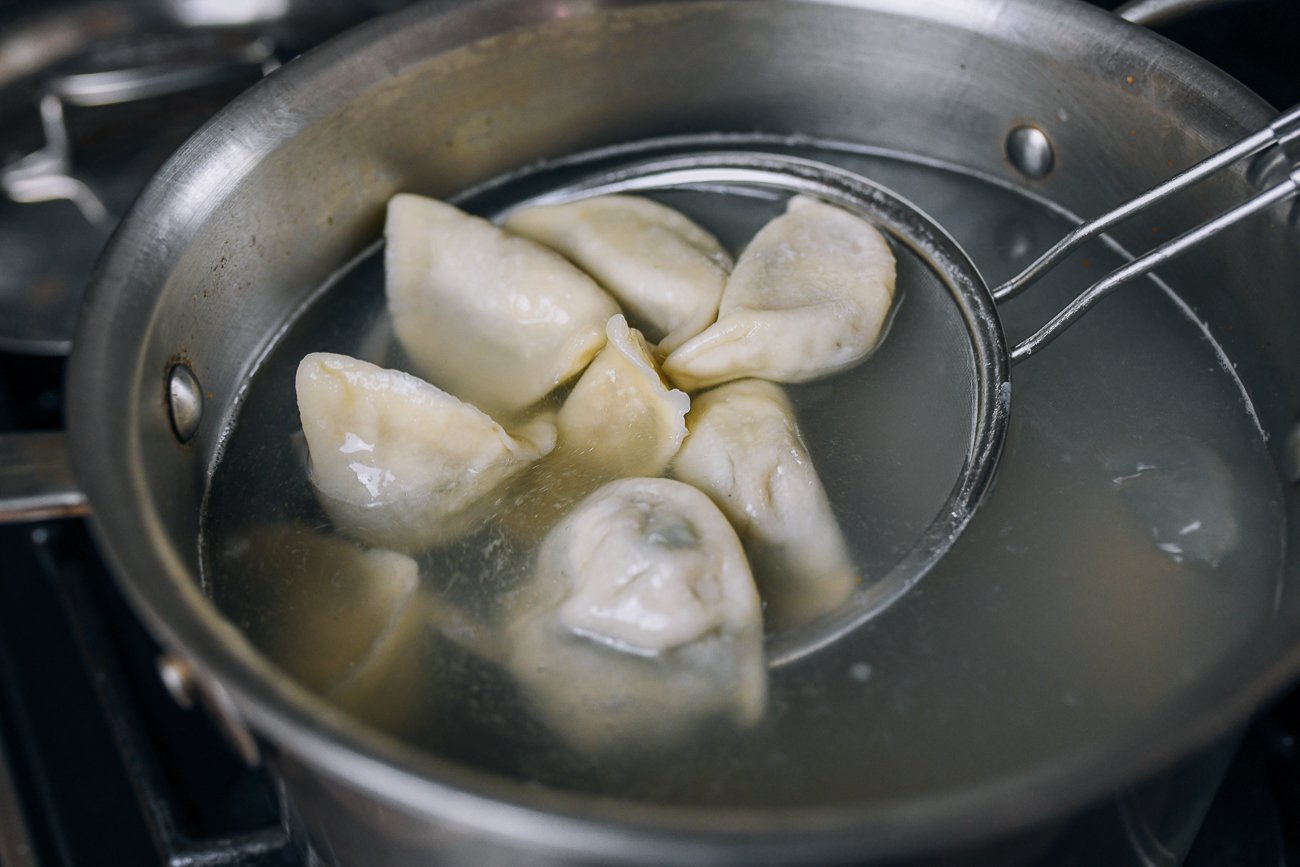
To boil: Bring a large pot of water to a boil and throw the dumplings in there. Bring the water back up to a boil, and boil for 6-8 minutes (longer if using frozen dumplings).
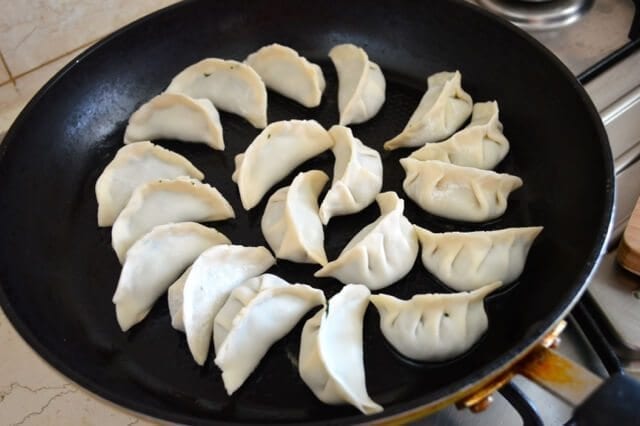
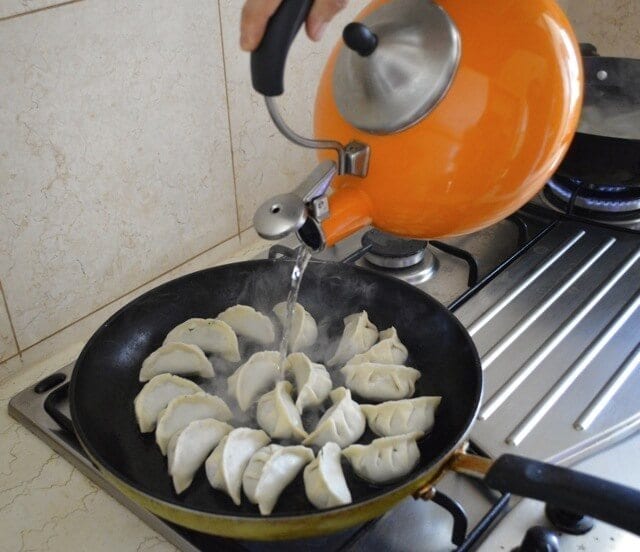
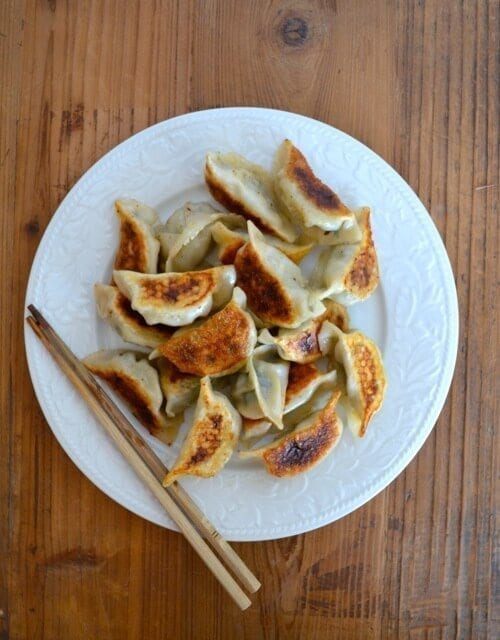
To pan-fry: Heat a non-stick pan or cast-iron skillet over medium high heat and add a couple tablespoons of oil. Add the dumplings in a circular formation around the pan and allow them to fry for a couple minutes. Then, pour a thin layer of water into the pan.
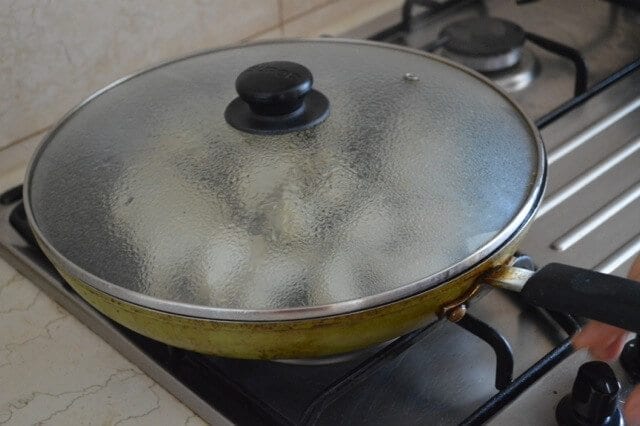
Cover and reduce the heat to medium-low. Steam until the water has evaporated. Check the dumplings. If they still look a little raw, put in some more water, cover the pan again, and steam them for a little longer. Once all the water has evaporated and they look cooked through, raise the heat to medium high and allow them to cook uncovered until the bottoms are golden brown and crisp.

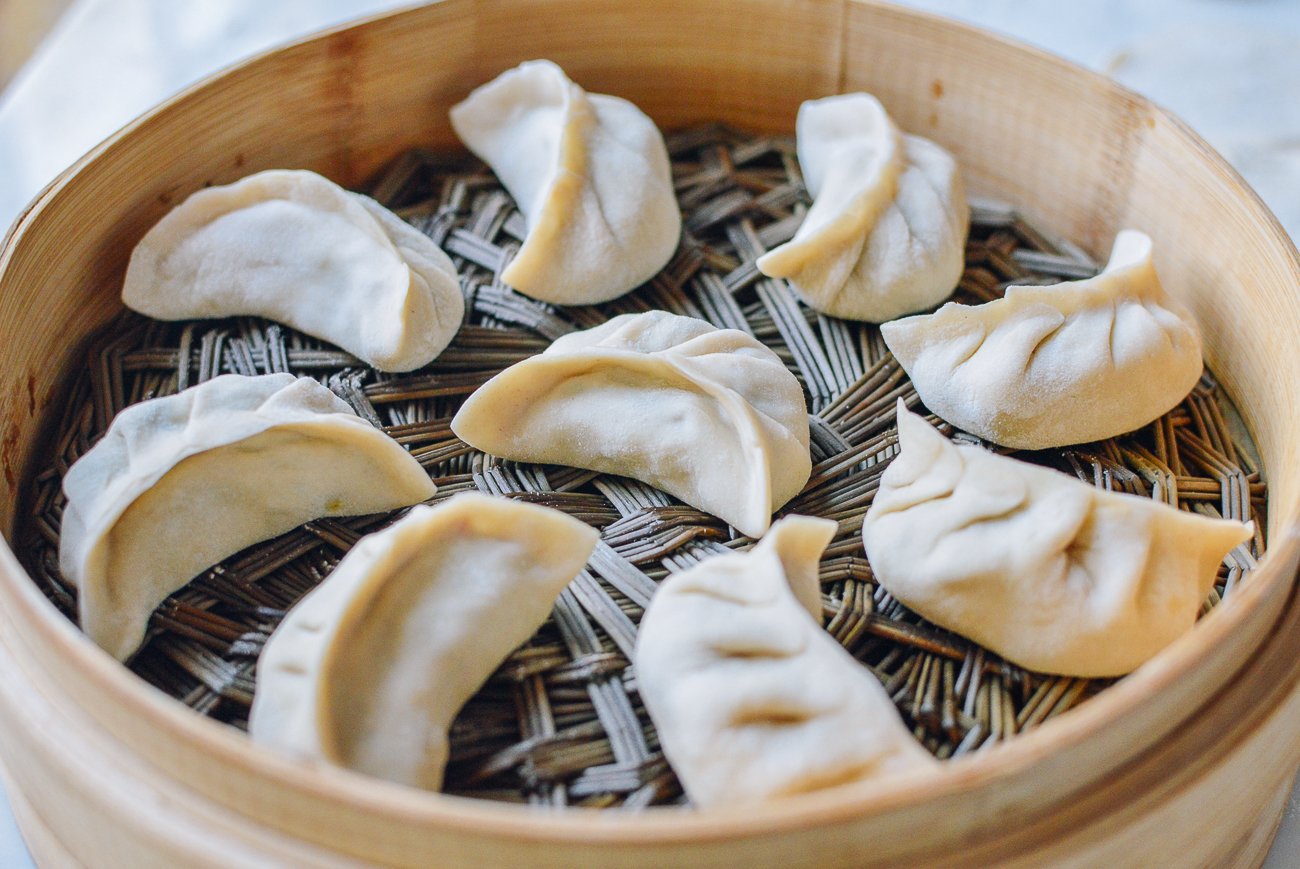
To steam: line a bamboo steamer with perforated parchment paper, damp cheesecloth, or thin cabbage leaves. Place the dumplings in the steamer basket 1/2 to 1 inch apart. Bring the water to a simmer of medium-high heat. Place the covered steamer in your wok and steam for 8-10 minutes (shorter for fresh dumplings, longer for frozen).

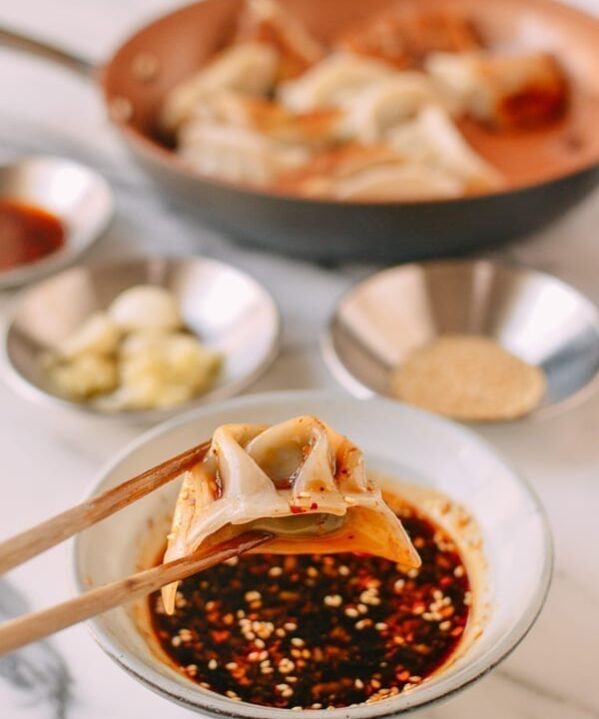
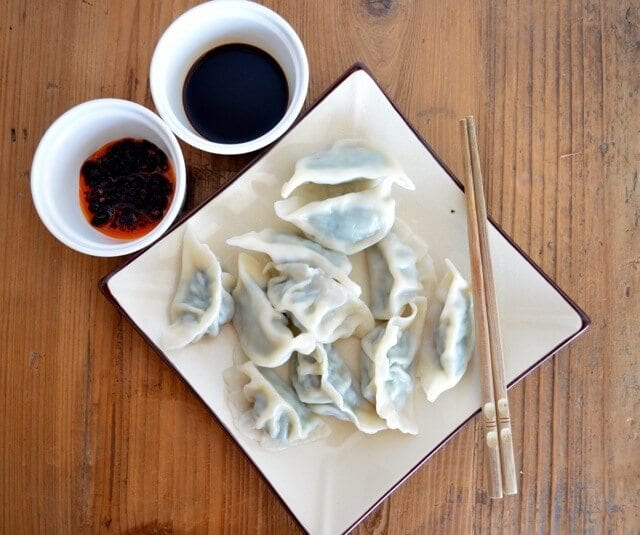
And finally…serve the little darlings! These are little pockets of light, joy, and deliciousness.
Get a full tutorial on how to cook dumplings (steaming, boiling, or pan-frying).

P.S. We like to eat our pockets of light, joy, and deliciousness with chili sauce and Chinese black vinegar. For a full recipe and explanation on the perfect dipping sauce, see our traditional dumpling sauce recipe.
P.S.S: If you’d like to freeze them, place the dumplings so they’re not touching on a parchment-lined baking sheet. Cover with tightly with plastic wrap (or clean plastic grocery bags), and put the pans in the freezer. Allow them to freeze overnight. You can then take the sheets out of the freezer, transfer the dumplings to freezer bags, and throw them back in the freezer for use later. Use within 3 months for best taste.
P.S.S.S. Phew. This was a long one. I feel I need this last P.S. to decompress. Generations of acquired knowledge in this dumpling recipe, all rolled into one tidy post, without skimping on detail. For those of you who don’t like reading as many words as I’ve written here, here’s a condensed, printable version of the recipe:
Looking for other dumpling filling ideas? Check out our full list of dumpling recipes here. If maybe this isn’t the only dumpling recipe you think you need, also check out our recipes for specialty dumplings like our Soup Dumplings, Crystal Dumplings, and Egg Dumplings.
Watch: Sarah shows you the way to perfect, juicy dumplings!
The ONLY Dumpling Recipe You’ll Ever Need

Ingredients
- 3 lbs green leafy vegetable (like shepherd’s purse, baby bok choy, or napa cabbage)
- 1 ½ pounds ground pork (can substitute ground chicken or beef, as long as they aren’t too lean)
- 2/3 cup shaoxing wine (or dry cooking sherry)
- ½ cup neutral oil (such as canola, vegetable, or avocado oil)
- 3 tablespoons sesame oil
- 1 tablespoon salt
- 3 tablespoons soy sauce
- ¼ teaspoon white pepper
- 2/3 cup water (plus more for assembly)
- 3 packages dumpling wrappers
Instructions
- Wash your vegetables thoroughly and blanch them in a pot of boiling water. (1 minute for delicate leaves like Shepherd's purse, or 2 minutes for a more robust vegetable like napa cabbage or baby bok choy.) Cool by transferring to an ice bath or a colander under cold running water. Ring out all the water from the vegetables and chop very finely.
- In a large bowl, stir together the vegetables, meat, wine, oil, sesame oil, salt, soy sauce, white pepper, and water. Mix vigorously for 6-8 minutes (or even up to 10 minutes), until very well-combined and paste-like.
- To wrap the dumplings, dampen the edges of each circular wrapper with some water. Put a little less than a tablespoon of filling in the middle. Fold the circle in half and pinch the wrapper together at the top. Then make two folds on each side, until the dumpling looks like a fan. Make sure it’s completely sealed.
- Boil a couple dumplings to taste test them, and adjust seasoning if needed. Finish assembling the dumplings, placing them on a parchment-lined baking sheet so they are not touching.
- To freeze: wrap the baking sheets tightly with plastic wrap and put the pans in the freezer. Freeze overnight, then transfer the dumplings to freezer bags, and transfer back to the freezer for later.
- To boil: bring a large pot of water to a boil, drop the dumplings in, and bring back up to a boil. Simmer for 6-8 minutes (shorter for fresh dumplings, longer for frozen).
- To pan-fry: heat 2 tablespoons oil in a non-stick pan over medium-high heat. Place the dumplings in the pan and allow to fry for 2 minutes. Pour a thin layer of water into the pan, cover, and reduce heat to medium-low. Allow dumplings to steam until the water has evaporated. Remove the cover, increase heat to medium-high and allow to fry for a few more minutes, until the bottoms of the dumplings are golden brown and crisp.
- To steam: place dumplings in a steamer basket lined with damp cheesecloth, perforated parchment paper, or thin cabbage leaves. Bring water in a steamer to a simmer, and steam over medium-high heat for 8-10 minutes (shorter for fresh dumplings, longer for frozen).